
Trade Show & Exhibition Booth Planning Checklist: A Step-by-Step Guide for the Philippines
Picture this: it's opening day at the trade show or exhibition. The doors swing open, thousands of visitors pour into the hall, and they walk past your booth in about three seconds. In those three seconds, they decide whether to stop or keep walking.
Here's the twist. That decision was shaped months earlier, when your booth was still just an idea. Most booth problems we see on the show floor, like rushed fabrication, a design the organizer rejected or a booth with no power on day one, all start with planning that began too late.
The good news? A great trade show or exhibition booth isn't luck. It's a checklist. Below is the exact one our team uses when we design, fabricate and install booths for shows like WORLDBEX, PhilConstruct and the Manila International Auto Show (MIAS).
Prefer a printable version? Download the free Trade Show & Exhibition Booth Planning Checklist (PDF) and tick things off as you go.
Step 1: Start your trade show booth planning early (yes, earlier than you think)
A custom booth goes through design, approvals, organizer submissions, fabrication and installation. Squeeze that into a few weeks and you pay for it in rush fees, compromises and stress. Here's a timeline that keeps you calm.
4 to 6 months before: lay the foundation
Lock in the show, your booth space, size and spot on the floor plan.
Decide what success looks like: leads, a product launch, brand awareness or partner meetings.
Agree on a budget range and who signs off on the design.
Get the exhibitor manual and highlight every deadline.
3 to 4 months before: bring the idea to life
Brief your booth contractor and ask for a 3D design and quotation.
Gather brand assets: logos, key visuals, product photos and key messages.
Choose your crowd-puller: a demo, game, giveaway or photo spot.
6 to 10 weeks before: make it official
Approve the final 3D design, materials and finishes.
Submit booth plans and contractor details to the organizer if required.
Order power, internet, furniture and AV from the exhibitor manual.
Send print-ready files for your graphics.
2 to 4 weeks before: line up the logistics
Confirm ingress (setup) and egress (dismantling) schedules.
Book booth staff, uniforms, lead-capture tools and giveaways.
Plan who receives your products on site, and where they'll be stored.
Show week and after: deliver and follow up
Walk through the finished booth and check it against the approved design.
Brief your team on key messages and how to spot a serious buyer.
Keep the booth clean, stocked and well lit, every single day.
Follow up with every lead within the week, while they still remember your booth.
Pro tip: the best time to plan your next booth is the week after your last show. Your lessons are fresh, and early booking gives you more options.
Step 2: Read the exhibitor manual (before anyone starts designing)
It's not exciting reading, but the exhibitor manual is where good booths are saved from expensive redesigns. Every show has its own rules, so check these first:
Deadlines: design submission, contractor registration, and orders for power, internet and rentals.
Build rules: maximum height, hanging signs, open sides, wall setbacks and fire-safety requirements for materials.
Schedules: ingress, egress, deliveries and loading-dock access.
On-site services: electrical load per booth, venue furniture and AV, and exhibitor badges.
Pro tip: send the exhibitor manual to your booth contractor on day one. A good contractor will flag the rules that affect your design before you fall in love with something you can't build.

Step 3: Pick the right exhibition booth type for your goals
Not every brand needs a giant island booth at a trade show or exhibition. The right choice depends on your goals, your spot on the floor and your budget.
Shell scheme (the organizer's standard booth): quick and simple, great for first-timers. Make it pop with custom graphics, lighting and product displays.
Raw space with a custom build: for brands that want to own the room. You control the structure, branding, lighting, meeting areas and interactive zones.
Inline (one open side): budget-friendly. Put your boldest branding on the back wall, facing the aisle.
Corner (two open sides): catches traffic from two aisles, with room for displays on both sides.
Island (four open sides): maximum visibility, usually for booths 36 sqm and up, with space for tall headers, meeting rooms and full brand experiences.
For example, our TAGAWA Lab booth at WORLDBEX 2025 used a clean, Japanese-minimalist design to stand out in a busy hall, proof that standing out isn't always about being the biggest.
Step 4: Know what really drives your trade show and exhibition booth cost
Ever wondered why two booths of the same size can have very different price tags? It usually comes down to these:
Size and height of the booth.
A custom build versus rental or modular systems.
Materials and finishes: wood, acrylic, metal or fabric.
LED walls, screens and lighting.
Interactive features like games, demos and photo spots.
Venue and logistics, especially for shows outside Metro Manila.
Rush timelines and night work.
Parts you can store and reuse at your next show.
Pro tip: share a budget range in your brief. It's not about spending more. It lets your contractor design to your number and show you where each peso makes the biggest impact, instead of redesigning after the quote.

Step 5: Design an exhibition booth people actually stop at
A booth only works if visitors notice it, understand it and step in. Run your design through this quick test before you approve it:
Can people see your brand from the aisle, at eye level and above?
Is there one clear message visitors get in seconds?
Are real products on display, not just graphics?
Does the lighting make the booth feel premium?
Is there a reason to stop, like a demo, game, raffle or photo spot?
Is there a seat or meeting area for serious buyers?
Is there hidden storage for stock, bags and giveaways?
Is there a simple way to capture leads, like a QR code?
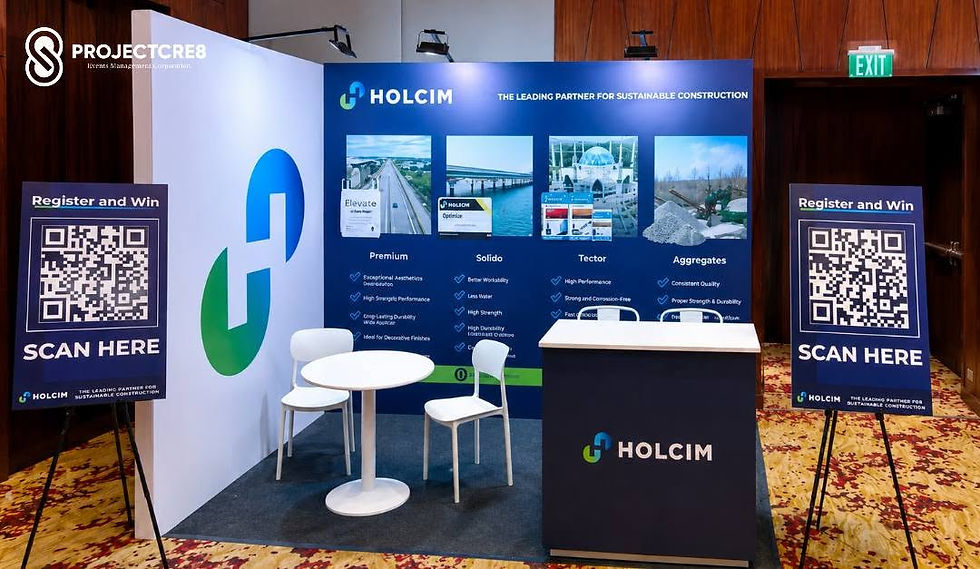
Want to see this in action? Our Holcim booth at PhilConstruct 2026 Davao combined a bold header, a real product wall and a Play & Win corner that kept visitors gathering, and it was named a Best Booth nominee.

Step 6: Give your exhibition booth contractor a brief they can work with
The better your brief, the better (and more accurate) your design and quote. Copy this list into your next email:
Show name, dates and venue.
Booth size, booth number and open sides.
Your goals for the show.
Products and items to display.
Logos and brand guidelines.
Must-haves: storage, a meeting area, LED walls and so on.
Your budget range.
Your internal approval deadline.
Your 5-minute quick start
Feeling the pressure? Do these five things this week and you're already ahead of most exhibitors:
Confirm your show and booth space.
Write down your top goal for the show.
Download the exhibitor manual.
Set your budget range.
Send your brief to a booth contractor.
Frequently asked questions
How early should I start planning a trade show or exhibition booth?
For a custom booth, start 4 to 6 months before the show. That leaves enough time for the 3D design, approvals, organizer submissions and fabrication without rush costs.
What's the difference between a shell scheme and a custom booth?
A shell scheme is the organizer's standard booth with basic walls and fixtures. A custom booth is designed and built for your brand on raw space, so you control the structure, branding, lighting and layout.
What should I prepare before asking for a booth quotation?
Have your show details, booth size and open sides, goals, products to display, brand files, must-haves and a budget range ready. These help your contractor give you an accurate design and quote.

Is a trade show booth the same as an exhibition booth?
Yes. In the Philippines, "trade show booth" and "exhibition booth" usually mean the same thing: a branded space where a company displays its products and meets visitors at an expo. The same planning steps in this checklist apply to both.
How much does an exhibition booth cost in the Philippines?
It depends on the booth size and height, whether it is a custom build or a rental system, materials and finishes, LED walls and lighting, interactive features, venue logistics and your timeline. Share your brief and budget range with a booth contractor to get an accurate quotation.
Let's build your next trade show or exhibition booth together
At ProjectCre8, we're a booth contractor in the Philippines that handles everything from 3D design to in-house fabrication and installation, for trade shows and exhibitions nationwide.
Planning a trade show or exhibition booth for WORLDBEX, PhilConstruct, MIAS or another show? Send us your brief and we'll prepare a design and quotation for your booth. Let's Cre8 something people stop for.


Comments